Friday, October 1, 2010

Treehouse Treats

The "Treehouse" is a nickname I gave my apartment a while back because it's so quaintly tucked away in the trees above a garage. Sitting in my living room, aka a closed-in porch, you literally feel like you have just shrunk to the size of a squirrel and are perched atop a tree. Ironically, my one bedroom getaway is also in the middle of everything for an LSU student! I can even walk to campus. The best of both worlds if you ask me.
Being that my apartment is 30+ years old and teeny-tiny. My appliances are not suited to cooking above the quantity of "eating to live"...for one. However, I make due baking with my half-size oven and hand mixer just fine minus the sharp increase in cook time. I store all my baking stuff on the top shelf of my cabinet, which I can't reach, so pre-baking requires climbing on the counter.


After I received 2 paid-orders, one for cookies and the other 2 cakes, I seriously considered advertising, baking out of my apartment and calling my company "Treehouse Treats." I found out shortly that devoting 20 hours of your weekend to baking is not really suited to college life especially during LSU football season. I decided instead just to keep business open for "freelance" baking when the opportunity or friend presents itself.

Also, I have decided to stop boring you all with my recipes and instructions. Firstly, it is way too time consuming for me to write making it a chore for me and secondly, I know half of my friends just look at the pictures (because that's what I would do). So from now on, I'll just be giving a general discription with lots of pictures. Plus, if I come up with some crazy good secret recipe, I don't want all of you knowing!

Healthy Monsters
An original recipe I'm still tweaking since these came out a little sticky. Basically it's a peanut butter oatmeal cookie with healthy trail mix. Uses half the amount of sugar as my traditional monster cookie recipe and no butter, shortening, or dairy. I like to think its a cookie-granola crossdresser.


LSU Sugar Cookies
Thick, buttery, almondy, sugarly deliciousness. No health short cuts here ...just pure fattening deliciousness. Still an amateur with the decorating but learned how to make a cookie icing! All cut-outs were done by hand since every fleur de lis cookie cutter in Baton Rouge had already been gobbled up by all the housewives hosting Saints parties. However, I will admit I used a cardstock template cut-out of the NOLA Saints logo as a guide. Think I'll work on molding my own cookie cutters from scrap metal soon.

White Strawberry Cake
A two-layer white cake with strawberry filling, whipped cream icing, and topped with fresh sliced strawberries. I've never done a strawberry cake before so this was a first. Wasn't really sure what to do for the strawberry filling, so it came out more like strawberry preserves. I also wasn't brave enough to add anything to the whipped cream besides sugar. The white cake turned out fabulous though. Next time I'll do more research and come up with something a little more original. I love my new square cake pan I used for this one!

Tried-n-True Carrot Cake
Maybe the one baked good I can honestly say I have mastered. Thanks to the passing down of this recipe to my mother from some great cooks & women of Lutcher, I have "stood on the shoulders of giants" minus the discovery of gravity. I have made this cake about 10 times now and tweaked the recipe a bit each time to find out what's best. For any of you who are unfamiliar with carrot cake, one it does not taste like carrots, two it's made with oil and no butter, and three it is my favorite cake so you need to try it! I decorated with cream cheese icing, pecans (which I should have toasted but forgot) and little icing carrots.
The customer liked this one so much I'll be making another one for her this coming Monday!

I still have an original recipe, LSU blackberry surprise mini cupcakes, that I need to post but those will come later! Until then, happy eating!

Monday, September 6, 2010

Keep Your Day Job

Ok...so as of last blog, I planned to start my new job at Baum's. We'll....Baum's bombed, in all negative aspects of the word. For reasons I will not elicit here, my first day at Baum's turned into my last day at Baum's. Retail baking, especially in my case, was not the smiles & rainbows that I'd imagined. Baking in one's own kitchen, taking pride in your work and watching people eat your masterpieces is nothing like working at a commercial bakery. So taking after Brett Farve, I went back to my Pennington job with more flexible/desirable hours and coworkers I can feed with my old-fashioned home baking.I am not naive; I realize the world outside of student work is not so forgiving. I'm just glad I learned the lesson of "keep your day job" earlier rather than later. As my Dad constantly reminds me "work is work, if you liked it then it wouldn't be called work."

On the up side, the rest of the week was work-free lending itself to more recreational cooking and baking!! A couple weekends ago my parent's took a road trip to Austin to visit my sister leaving their house vacant....you know what that means....AN EMPTY KITCHEN! As soon as I got out of class on Friday, I scooted over there, started cooking and invited my girl friends over for dinner and a House marathon! Using my Baker's Manual and a new addition to my baking collection, BakeWise, I planned out my menu of mozzarella sticks, homemade pizza and chocolate lava cake.


Marinara Sauce - Giada's recipe, for dipping cheese sticks and pizza sauce
1/4 cup extra-virgin olive oil
1 small onion, finely chopped
1 garlic clove, finely chopped
1 stalk celery, finely chopped - forgot to buy this at the grocery, used about 1/2 tbsp of celery seed instead
1 carrot, peeled and finely chopped
1/4 tsp salt
1/4 tsp freshly ground black pepper
32-ounce can crushed tomatoes
1 dried bay leaves
Over medium-high heat, I sauted the onion and garlic in the oil until translucent. Added the carrots, celery seed, salt and pepper and cooked until carrots were soft. Threw in the tomatos and bay leaf, turned down the heat to low and let it simmer for about an hour while moving onto my lava cakes!

Pizza Crust
255 g (1 1/3 cups) cool water
17 oz (~3 3/4 cups) all purpose flour
7 oz (~1 1/2 cups) bread flour
0.165 oz (1 1/2 tsp) rapid rise yeast - recipe calls for half but I accidently used double and it worked out well, rose very quickly
1 oz (1/8 cup) olive oil
1/2 tbsp honey
1/2 tbsp salt

Heat the water to ~105 degrees F. Mix (with hook) the flour and water in stand mixer, which I actually had thanks to Mom's kitchen.
Add the yeast, oil, honey. Knew with hook on low speed until combined then add salt. Increase the speed to medium for 8-10 min. The dough will be quite sticky, not to worry. Grease a bowl and plop your dough into it, grease your hands and form into a mound. Cover with plastic wrap and let it rise for about 1 hour.
When the dough has double in size, punch it down and roll it out into your pizza round. Perforate before adding your toppings to avoid air bubbles.
Bake the dough at 500F for 5 min. then add your toppings.
I like to add cheese between layers to keep everything glued together. First was the sauce with a layer of mozzarella cheese. Then tomatoes, and green peppers topped with cheese.
And finally pepperonis & mushrooms topped with a little grated parmesan.
Bake at 500 for 10 more min. until crust is browned and cheese melted!
Nom-noms.

Mozzarella Sticks - a truly original Katie recipe!
I've only concocted 2 truly original recipes at present and here is the second.
2 egg whites
2 tbsp milk
4 oz mozzarella (1/2 of a block)
1 cup Italian Bread Crumbs
1 cup grits
Salt & pepper

Whist the egg whites together with the milk for your egg wash. Cut the mozzarella into sticks with about 1-2cm width and 4 in. length. Dip the sticks in the egg wash then roll in the italian bread crumbs.
Once you've dipped all the stick in the bread crumbs, wash them in the eggs onces more and roll in ....hold your breath....GRITS! Sturdy enough to hold the cheese in and gives a crunchy coat.
Make sure you completely coat the sticks with the bread crumbs and grits or else the cheese will ooze out of any uncoated regions during baking/frying. Ideally you would fry the sticks but I baked them at 500 for about 5 min then finished them off by pan frying them in some oil.
Open up!!!
Bingham enjoyed some left overs a couple of days later...

Intense Chocolate Lava Cakes

Nonstick cooking spray
8 oz. semisweet baking chocolate
1 cup unsalted butter
3 large eggs
3 large egg yolks
6 tbsp sugar
5 tbsp all-purpose flour

Just looking at those ingredients might make your arteries wince. And let me tell you, this stuff is toxicly rich, make sure you have some tums for this bad boy.
I sprayed down the ramekins (or as you can see, whatever I could find) and lined them with parchment paper and sprayed on top of that also & set aside 6 tbsp of the chocolate.

In the mixer, I whisked the eggs, yolks, and sugar for 15 min. In a double boiler, I heated up the remaining chocolate with the butter until it was just melted then took it off the heat to cool. Turned the speed down on the mixer then added the flour.

I then whisked in the cooled chocolate/butter in until it was smooth.

After you parcel out the batter, put a tbsp of chocolate in the center. It's best if the piece of chocolate kinda floats in the batter, but if they are too big don't push the chuck to the bottom or else when you flip it over you'll have a little well of chocolate. It would be better just to leave some exposed to the top (which I learned the hard way).

Bake in the center of the oven at 325-350F for about 10 min until the outside is done but the center is jiggly. Run a knife around the edge, flip over, peel off the paper and definitely serve with ice cream! (or settle for frozen whipped cream).

Much more baking to come! I'm starting to get paid cake orders so keep up, this could get interesting!


Sunday, August 22, 2010

New Baking Horizons

On an uncharacteristic whim, I (Katie) resigned from my research job at Pennington Biomedical for a position at Baum's Fine Pastries, a family owned bakery in Baton Rouge. I figure, you only live once, and medical school does not lend itself to many time-consuming hobbies such as baking so why not dabble while the gettin's good.

My new job (which I start Aug 30!) and a trip to the public library with Bingham inspired me to check out a professional baking book, The Baker's Manual, in the hopes of learning more of the "whys" of baking rather than the "whats." Right away, I became convinced that weighing ingredients instead of measuring is key (even though Alton Brown has been preaching that to me for years through my TV). So I made Alton's day and bought a pretty expensive scale (and of course a few other nifty baking gadgets which I couldn't resist). After reading, I also came to the conclusion that all baked good are like high maintenance divas; they require strict ingredient quantities and temps, you gotta treat 'um right (no over kneading or under mixing) and they need alot of "beauty rest."
I decided to put my health conscience aside and try my new baking by weighing method with croissants.


Croissants


Detrempe (Dough)
6 fl.oz (3/4 cup) water
6.25 fl.oz (3/4 cup) milk
1 3/4 oz (1/4 cup) granulated sugar
0.4 oz rapid rise, instant yeast
1 tsp salt
8 1/4 oz shifted bread flour
8 1/2 oz all-purpose flour


Beurrage (Butter)
3 tbsp all-purpose flour
1 3/4 cups unsalted, cold butter in pieces


The recipe calls for the water and milk to be cold and the use of fresh yeast (aka compressed or cake yeast) however, that is no where to be found in Baton Rouge. Fresh yeast does not require hot water for appropriate hydration of of the yeast, however rapid rise does (105 degrees to be exact) which is what I settled for.
I started out by heating the milk and water to 105 in the microwave (checking temp with a thermometer) while weighing out all my dry ingredients. Once at 105, I whisked in the sugar, yeast and salt. Sugar feeds the yeast, salt keeps yeast growth in check.


The recipe then says to gradually add the flour with the dough hook of your mixer at a low speed (Katie translation: mix with large spoon, bowl on hip, use much muster). After all the dough is mixed in, turn on mixer to medium speed for 2 min. (Katie translation: mix harder, switch arms when tired).

Form the dough into a loaf and retard (refrigerate) overnight. I just did this for about an hour because I didn't have all night but the longer you retard the dough, the more flavor will develop from the yeast.


For the beurrage, put the "heart attack" of butter in your mixer with the flour and mix on lowest speed until malleable but still cool. (Katie translation: mix on hip, get frustrated, figure a clumpy mess is the best you can do). Form the butter into a 5-in square block on a floured surface by pounding with rolling pin.

Take out the dough and roll into a 7-in square. Place the 5-in block catty-cornered on top the dough. Wrap the butter up like a little package, folding the corners of the dough over the butter. Press the dough and pound gently with rolling pin to seal the dough.

Roll out dough package into a long rectangle roughly 9x21 in. Please notice the 3 tubs of cottage cheese in my fridge, with sunflower seeds and Tony's...it's an addiction.

For the second turn, turn the dough 90 degrees (so that the layers of the fold face you) and roll out into a 24x8 in rectangle.

Fold the dough in a 4-fold or book turn by taking both short ends towards the middle to look like an open book, then closing the book. Chill for 45 min.


Turn and roll out the dough once more finishing in a business letter fold. Retard for 1 hour.

Now the fun part (FINALLY only took 4 hours). Roll the dough out into a long rectangle with 1/4 thickness. I found it helped to do on hot-dog fold in the middle of rolling to get the dough to roll out long enough but to still keep a skinny rectangle. Make sure you flour your board very well. Let the dough rest before cutting to prevent shrinkage.

First cut your long rectangle into squares and then each square in half for a triangle. Gently pull and stretch the triangles to enlarge them. To roll them up, put a small piece of scrap dough at the base of the triangle and roll it up. Stretch out the arms by rolling the triangle ends against the table as you roll.

Recipe says to proof them (meaning pop them in the oven with a pot of boiling water) until 1.5 times larger. However, being that it was 11pm at this point and fatigue became overpowering to the desire to finish. I greased some Saran wrap and put them in the fridge overnight and proofed them in the morning.

Brushed them with some egg wash and baked at 375 for 20-25 min, until golden brown cooling them down on my newly purchase cooling rack! They got rave reviews from my parents, Bingham's parents, and work friends!


Check out those layers! You can see Elizabeth, my friend from work, in the background going back for more :)


Speaking of work, my friends at Pennington threw me a going away party in which case I demanded to make my own cake. Unfortunately my friends and I decided to do $1 wine at JL's the night before, meaning that the morning of the party I'm trying to throw together a cake while battling and pounding head-ache.

Inspired by a Baking with Julie Child episode, I decided to do a very easy, light Chiffon cake (like sponge cake) with fig filling and whipped cream. No weighing ingredients this time however due to the circumstances.


Chiffon Cake
1 cup cake flour
2/3 cup sugar
1 tsp baking powder
1/4 tsp salt
4 large eggs, separated
1/4 cup vegetable oil
1/4 cup whole milk
1/2 tsp vanilla extract

Recipe calls for 2 9-in cake rounds but I only own one so I just did mine in a spring pan, greasing and flouring the bottom (NOT the sides).

Whisk the flour, sugar, baking powder, and salt together then add the egg yolks, oil, milk, and vanilla until smooth.

I then beat the egg whites to a stiff peak. It's better to have them room temp (no time in my case) and to use a metal bowl. I folded the egg whites (in 2 additions) into the cake batter (see Julia video for technique) and the dough went from a muddled mess to a light, fluffy cloud.

Baked at 350 for 25 min, cooled, then cut the cake in half with a long serrated knife using a very helpful technique I learned from the Julie video. Meanwhile I whipped up some heavy whipping cream with some sugar.

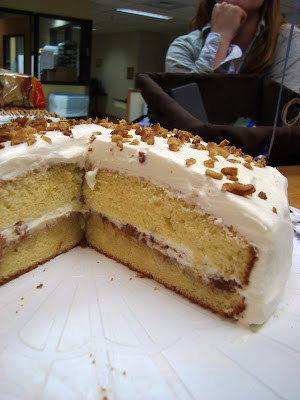
In the center, I slapped on some homemade fig preserves (with pecans!) made by Bing from the figs in his parents back yard and on top of that a layer of whipped cream. Put the top layer on, iced the whole thing with whipped cream and sprinkled with pecans.

Heaven! And approved by the PBRC InPatient unit, who've seemed to benefited the most from my new passion for baking. I will miss them.