 On an uncharacteristic whim, I (Katie) resigned from my research job at Pennington Biomedical for a position at Baum's Fine Pastries, a family owned bakery in Baton Rouge. I figure, you only live once, and medical school does not lend itself to many time-consuming hobbies such as baking so why not dabble while the gettin's good.
 My new job (which I start Aug 30!) and a trip to the public library with Bingham inspired me to check out a professional baking book, The Baker's Manual, in the hopes of learning more of the "whys" of baking rather than the "whats." Right away, I became convinced that weighing ingredients instead of measuring is key (even though Alton Brown has been preaching that to me for years through my TV). So I made Alton's day and bought a pretty expensive scale (and of course a few other nifty baking gadgets which I couldn't resist). After reading, I also came to the conclusion that all baked good are like high maintenance divas; they require strict ingredient quantities and temps, you gotta treat 'um right (no over kneading or under mixing) and they need alot of "beauty rest."
I decided to put my health conscience aside and try my new baking by weighing method with croissants.

Croissants
Detrempe (Dough)
6 fl.oz (3/4 cup) water
6.25 fl.oz (3/4 cup) milk
1 3/4 oz (1/4 cup) granulated sugar
0.4 oz rapid rise, instant yeast
1 tsp salt
8 1/4 oz shifted bread flour
8 1/2 oz all-purpose flour
Beurrage (Butter)
3 tbsp all-purpose flour
1 3/4 cups unsalted, cold butter in pieces
3 tbsp all-purpose flour
1 3/4 cups unsalted, cold butter in pieces
The recipe calls for the water and milk to be cold and the use of fresh yeast (aka compressed or cake yeast) however, that is no where to be found in Baton Rouge. Fresh yeast does not require hot water for appropriate hydration of of the yeast, however rapid rise does (105 degrees to be exact) which is what I settled for.
I started out by heating the milk and water to 105 in the microwave (checking temp with a thermometer) while weighing out all my dry ingredients. Once at 105, I whisked in the sugar, yeast and salt. Sugar feeds the yeast, salt keeps yeast growth in check.

The recipe then says to gradually add the flour with the dough hook of your mixer at a low speed (Katie translation: mix with large spoon, bowl on hip, use much muster). After all the dough is mixed in, turn on mixer to medium speed for 2 min. (Katie translation: mix harder, switch arms when tired).
Form the dough into a loaf and retard (refrigerate) overnight. I just did this for about an hour because I didn't have all night but the longer you retard the dough, the more flavor will develop from the yeast.

For the beurrage, put the "heart attack" of butter in your mixer with the flour and mix on lowest speed until malleable but still cool. (Katie translation: mix on hip, get frustrated, figure a clumpy mess is the best you can do). Form the butter into a 5-in square block on a floured surface by pounding with rolling pin.

 Take out the dough and roll into a 7-in square. Place the 5-in block catty-cornered on top the dough. Wrap the butter up like a little package, folding the corners of the dough over the butter. Press the dough and pound gently with rolling pin to seal the dough.
 Roll out dough package into a long rectangle roughly 9x21 in. Please notice the 3 tubs of cottage cheese in my fridge, with sunflower seeds and Tony's...it's an addiction.
 For the second turn, turn the dough 90 degrees (so that the layers of the fold face you) and roll out into a 24x8 in rectangle.
I started out by heating the milk and water to 105 in the microwave (checking temp with a thermometer) while weighing out all my dry ingredients. Once at 105, I whisked in the sugar, yeast and salt. Sugar feeds the yeast, salt keeps yeast growth in check.

The recipe then says to gradually add the flour with the dough hook of your mixer at a low speed
 (Katie translation: mix with large spoon, bowl on hip, use much muster). After all the dough is mixed in, turn on mixer to medium speed for 2 min. (Katie translation: mix harder, switch arms when tired).
Form the dough into a loaf and retard (refrigerate) overnight. I just did this for about an hour because I didn't have all night but the longer you retard the dough, the more flavor will develop from the yeast.

For the beurrage, put the "heart attack" of butter in your mixer with the flour and mix on lowest speed until malleable but still cool. (Katie translation: mix on hip, get frustrated, figure a clumpy mess is the best you can do). Form the butter into a 5-in square block on a floured surface by pounding with rolling pin.

 Take out the dough and roll into a 7-in square. Place the 5-in block catty-cornered on top the dough. Wrap the butter up like a little package, folding the corners of the dough over the butter. Press the dough and pound gently with rolling pin to seal the dough.
 Roll out dough package into a long rectangle roughly 9x21 in. Please notice the 3 tubs of cottage cheese in my fridge, with sunflower seeds and Tony's...it's an addiction.
 For the second turn, turn the dough 90 degrees (so that the layers of the fold face you) and roll out into a 24x8 in rectangle.
 Fold the dough in a 4-fold or book turn by taking both short ends towards the middle to look like an open book, then closing the book. Chill for 45 min.
Turn and roll out the dough once more finishing in a business letter fold. Retard for 1 hour.
Now the fun part (FINALLY only took 4 hours). Roll the dough out into a long rectangle with 1/4 thickness. I found it helped to do on hot-dog fold in the middle of rolling to get the dough to roll out long enough but to still keep a skinny rectangle. Make sure you flour your board very well. Let the dough rest before cutting to prevent shrinkage.

First cut your long rectangle into squares and then each square in half for a triangle. Gently pull and stretch the triangles to enlarge them. To roll them up, put a small piece of scrap dough at the base of the triangle and roll it up. Stretch out the arms by rolling the triangle ends against the table as you roll.

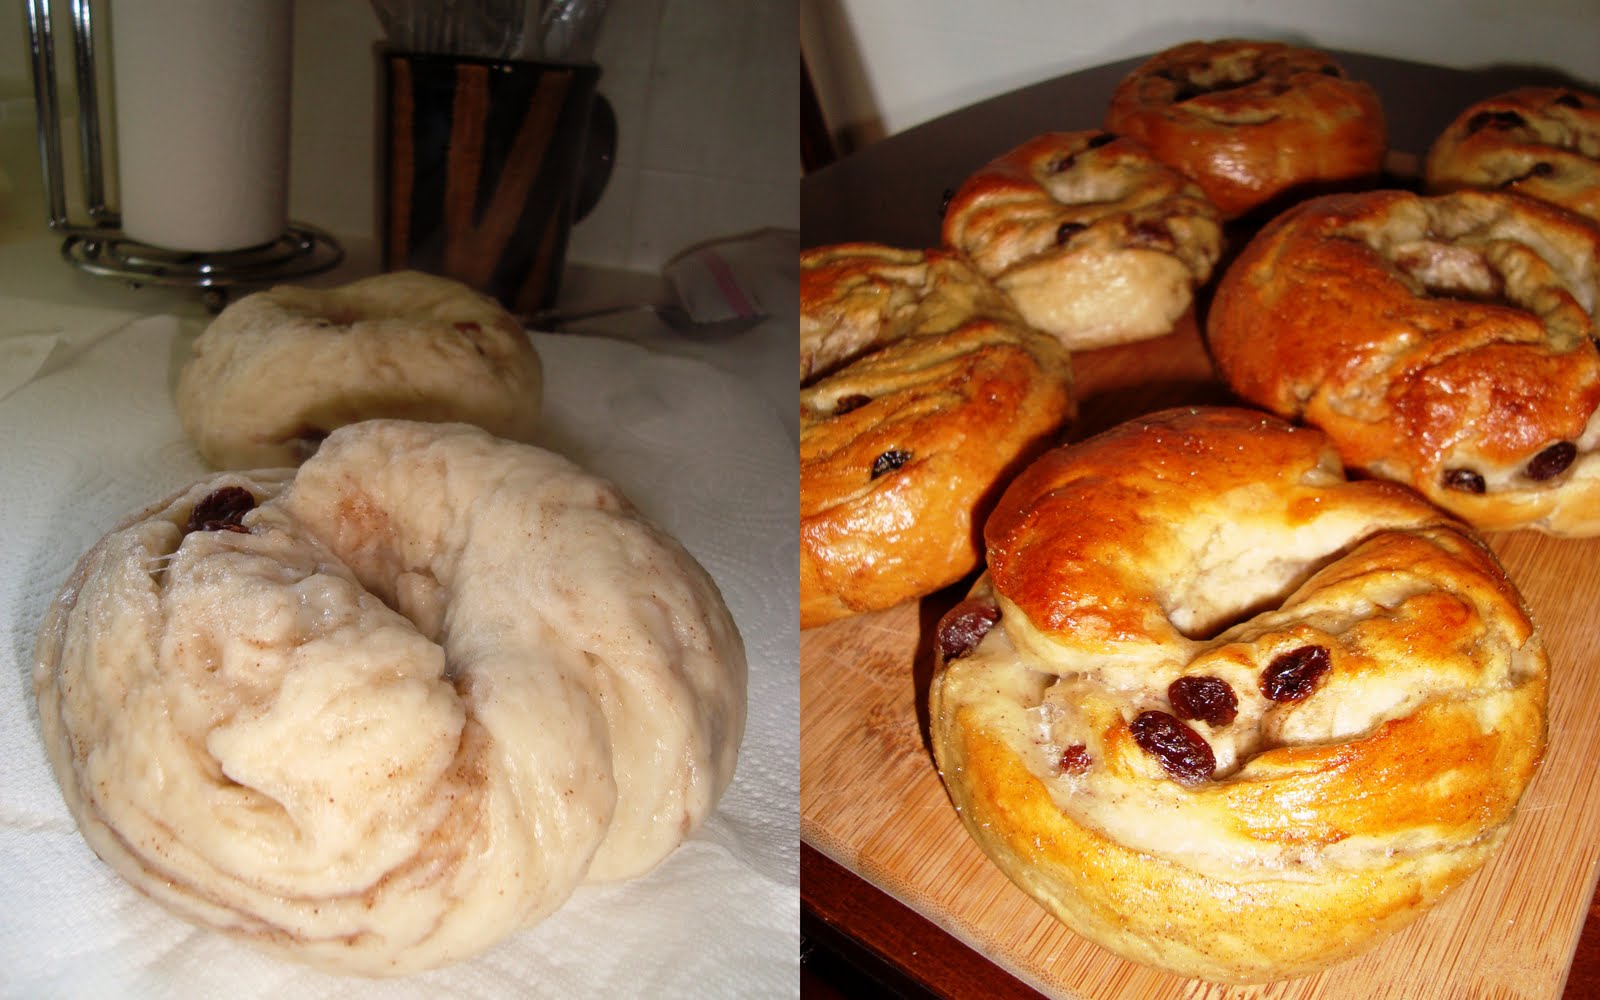
 Recipe says to proof them (meaning pop them in the oven with a pot of boiling water) until 1.5 times larger. However, being that it was 11pm at this point and fatigue became overpowering to the desire to finish. I greased some Saran wrap and put them in the fridge overnight and proofed them in the morning.

Brushed them with some egg wash and baked at 375 for 20-25 min, until golden brown cooling them down on my newly purchase cooling rack! They got rave reviews from my parents, Bingham's parents, and work friends!

Check out those layers! You can see Elizabeth, my friend from work, in the background going back for more :)

Speaking of work, my friends at Pennington threw me a going away party in which case I demanded to make my own cake. Unfortunately my friends and I decided to do $1 wine at JL's the night before, meaning that the morning of the party I'm trying to throw together a cake while battling and pounding head-ache.
Inspired by a Baking with Julie Child episode, I decided to do a very easy, light Chiffon cake (like sponge cake) with fig filling and whipped cream. No weighing ingredients this time however due to the circumstances.

Recipe calls for 2 9-in cake rounds but I only own one so I just did mine in a spring pan, greasing and flouring the bottom (NOT the sides).
Whisk the flour, sugar, baking powder, and salt together then add the egg yolks, oil, milk, and vanilla until smooth.
I then beat the egg whites to a stiff peak. It's better to have them room temp (no time in my case) and to use a metal bowl. I folded the egg whites (in 2 additions) into the cake batter (see Julia video for technique) and the dough went from a muddled mess to a light, fluffy cloud.
Baked at 350 for 25 min, cooled, then cut the cake in half with a long serrated knife using a very helpful technique I learned from the Julie video. Meanwhile I whipped up some heavy whipping cream with some sugar.
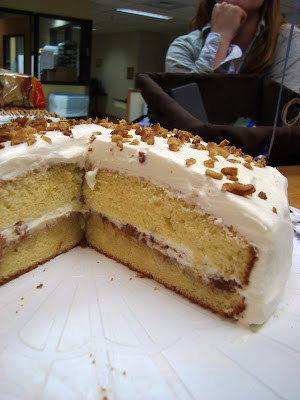 In the center, I slapped on some homemade fig preserves (with pecans!) made by Bing from the figs in his parents back yard and on top of that a layer of whipped cream. Put the top layer on, iced the whole thing with whipped cream and sprinkled with pecans.
 Heaven! And approved by the PBRC InPatient unit, who've seemed to benefited the most from my new passion for baking. I will miss them.


Check out those layers! You can see Elizabeth, my friend from work, in the background going back for more :)

Speaking of work, my friends at Pennington threw me a going away party in which case I demanded to make my own cake. Unfortunately my friends and I decided to do $1 wine at JL's the night before, meaning that the morning of the party I'm trying to throw together a cake while battling and pounding head-ache.
Inspired by a Baking with Julie Child episode, I decided to do a very easy, light Chiffon cake (like sponge cake) with fig filling and whipped cream. No weighing ingredients this time however due to the circumstances.

Chiffon Cake
1 cup cake flour
2/3 cup sugar
1 tsp baking powder
1/4 tsp salt
4 large eggs, separated
1/4 cup vegetable oil
1/4 cup whole milk
1/2 tsp vanilla extract
1 cup cake flour
2/3 cup sugar
1 tsp baking powder
1/4 tsp salt
4 large eggs, separated
1/4 cup vegetable oil
1/4 cup whole milk
1/2 tsp vanilla extract
Recipe calls for 2 9-in cake rounds but I only own one so I just did mine in a spring pan, greasing and flouring the bottom (NOT the sides).
Whisk the flour, sugar, baking powder, and salt together then add the egg yolks, oil, milk, and vanilla until smooth.
I then beat the egg whites to a stiff peak. It's better to have them room temp (no time in my case) and to use a metal bowl. I folded the egg whites (in 2 additions) into the cake batter (see Julia video for technique) and the dough went from a muddled mess to a light, fluffy cloud.
Baked at 350 for 25 min, cooled, then cut the cake in half with a long serrated knife using a very helpful technique I learned from the Julie video. Meanwhile I whipped up some heavy whipping cream with some sugar.
 In the center, I slapped on some homemade fig preserves (with pecans!) made by Bing from the figs in his parents back yard and on top of that a layer of whipped cream. Put the top layer on, iced the whole thing with whipped cream and sprinkled with pecans.
 Heaven! And approved by the PBRC InPatient unit, who've seemed to benefited the most from my new passion for baking. I will miss them.


